

Photo courtesy of Daily Gloss
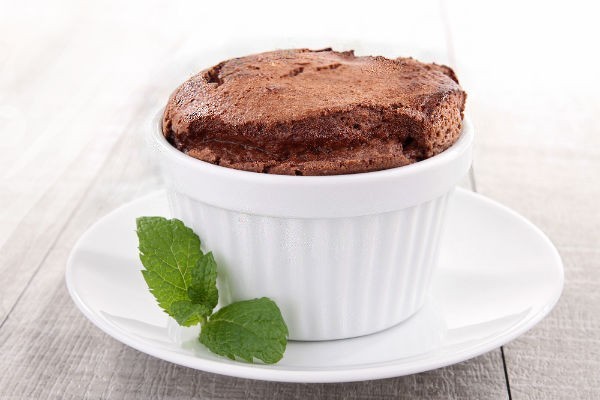
Souffle
Problem #1: Why does my souffle fall?
Save the day: Souffles will ALWAYS fall a little when you take them out of the oven. The faster it rises in the oven, the faster it falls when you take it out because of the air bubbles inside bursting rapidly. Prevent a dramatic fall by using a water bath to control the oven temperature (lower temperature = slower fall!). Avoid overbeating your eggs -it will create huge air bubbles which burst when heated, collapsing your souffle.
Problem #2: How do I know when my egg whites have been over-whipped?
Save the day: Perfectly beaten egg whites are stiff and can hold their shape on the beater. You know it's over-whipped when it's dry and lumpy. (See below for perfectly whipped egg whites)
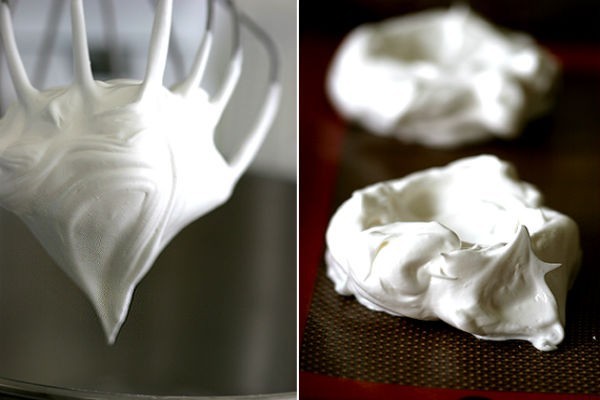
Photo courtesy of Globe Trotter Diaries
Problem #3: Help! My souffle exploded!
Save the day: Use a proper ramekin and remember to butter or sugar the insides of it! Buttering and sugaring of the ramekins also help the souffle to ‘climb’ (rise) nicely.
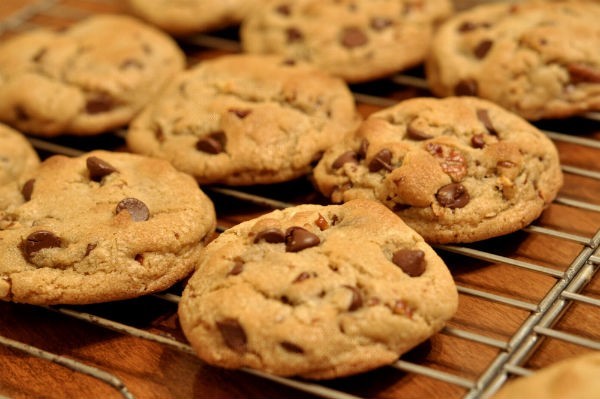
Photo courtesy of Atelier of Sweets
Cookies
Problem #1: Why are my cookies rock hard?
Save the day: Most likely, too much flour was added. Either that, or the cookies were baked in a low temperature over a long period. Avoid using bread flour as it's not soft enough. (Use cake or all purpose flour) Too much salt or sugar and too little baking soda will also harden the cake. Make sure you use a timer and maintain a consistent oven temperature.
Problem #2: The cookie dough spreads excessively / The outsides baked too quickly but the inside remained raw.
Save the day: Chill the dough before using it so it's tougher. Alternatively, try using lesser butter in the mixture. (Softened butter, not melted!)
Problem #3: How do I get my cookies to be chewy?
Save the day: Chewy cookies are the result of using less (melted) butter and a bit more sugar/flour. Bake at a higher temperature but for a shorter time, causing lesser liquid evaporation in the oven (when liquid evaporates, the cookies become crisp easily) -tadah, chewy cookies!

Photo courtesy of Strictly Ours
Macaron
Problem #1: Why are my macarons flat, lumpy/ cracked?
Save the day: This is due to the beating process -if it's flat, it's over-mixed. If it's lumpy and cracked, it's under-mixed. Cracked macarons are also due to an oven temperature that is too-high. A perfectly beaten macaron batter should look like this:

Photo courtesy of How To Cook That
Problem #2: Why aren't there 'feet*' on my macarons?
Save the day: The batter was too liquid and probably overmixed too. You can try “drying out” your batter, leaving them out for about 30 min to 1 hour before popping into the oven.
*ruffled layer on each macaron cookie
Problem #3: What does it mean to “dry out” my batter and to “age” my egg whites?
Save the day: This means to leave them piped on the bake-sheet, uncovered for 20 to 40 minutes (preferably in a cool, dry place) The batter will form a thin skin and shouldn’t stick to your finger if you carefully touch it. Aging egg whites means separating the whites from the yolks and storing the whites in an airtight container for 1-2 days before using. This reduces moisture content, resulting in batter with the perfect consistency.

Photo courtesy of Wallpaper Here
Cake (General)
Problem #1: Why do my cakes come out so moist even after the top is already browned?
Save the day: When the oven is not preheated, the top tends to cook much quicker than the insides. Preheat your oven and if need be, lower the temperature/move the cake down one rack level. Too much liquid can also make the cake wet and overly dense. For a fluffy texture, you need to cream the butter and sugar instead of using mix-ins.
Tip: Avoid cooling the cake in the pan unless the recipe specifies it!
Problem #2: How do I prevent my cakes from having holes/tunnels in them?
Save the day: You can lower your oven temperature, make sure your batter is mixed just right (stick to the beating speed & timing given by the recipe!) and avoid adding too much leavening/baking powder.
Problem #3: Why are my cakes so crumbly?
Save the day: Crumbly cakes could be caused by overmixed batter, too much flour, not enough sugar or not enough shortening. Bake the cake at the correct temperature and check the recipe measurements. Refrain from opening the oven door to check on the cake until it has finished rising.
Note that some cakes are supposed to have a slightly crumblier texture, like banana cakes.

Photo courtesy of New York City Feelings
Cake (Cheesecake)
Problem #1: How do I prevent my cheesecake from cracking?
Save the day: Be careful not to overmix and overbake the cheesecake. Whisk the eggs before adding them to the batter and mix on low speed just until blended. If there are other ingredients, mix them in with a spatula after this. Cracks form when the cheesecake is too dry so remove from the oven when the centre still wobbles a little.
Problem #2: How I stop my cheesecake from sinking?
Save the day: You can try using a waterbath. Water evaporates at the boiling point and the water bath will never get hotter than 100 degrees celsius, no matter what the oven temperature. This means that the outer edge of your cheesecake won't bake faster than the center. (When there is uneven cooking, the cake will sink and crack)

Photo courtesy of Najwa Kronfel, Kelley's Wilflife Blog
Molten Lava Cake
Problem #1: How do I know when to take my lava cake out from the oven?
Save the day: The edges of the cakes will become firm while the center is jiggly. You can stick a toothpick in half an inch, if it comes out clean, it's done. The cake will also rise above the pan. If there are protruding edges, this is also an indicator that it's done.
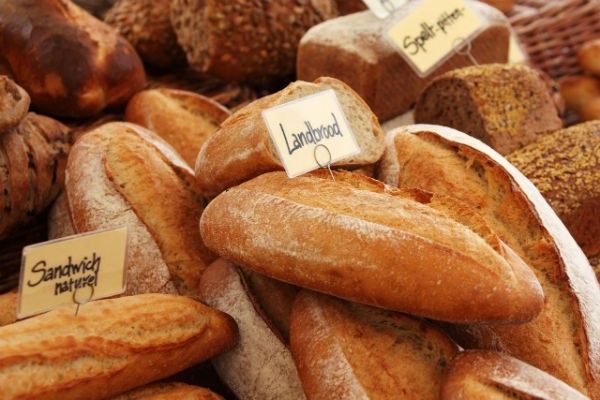
Photo courtesy of Desert Marigold
Bread
Problem #1: My bread doesn't rise like it should -is it because I didn't add enough yeast?
Save the day: Quantity of yeast isn't the only factor -salt has to be added when you mould your dough to make the texture stronger (without salt, your bread is also tasteless). You also need to knead your dough adequately, and make sure that the hot water added isn't overheated, or else the yeast will be “killed”.
Problem #2: My bread turns out dense. How do I create that ideal, fluffy bread texture?
Save the day: You need to create “pockets of air” by 1. Letting it rise enough (a good gauge would be til the dough doubles in size) and 2. Your bread dough needs to have an ideal consistency after the mixing process (not too dry/wet!)
Tip: Do not substitute flours as they have different moisture absorption potentials as well as gluten content! It may result in a very different texture.
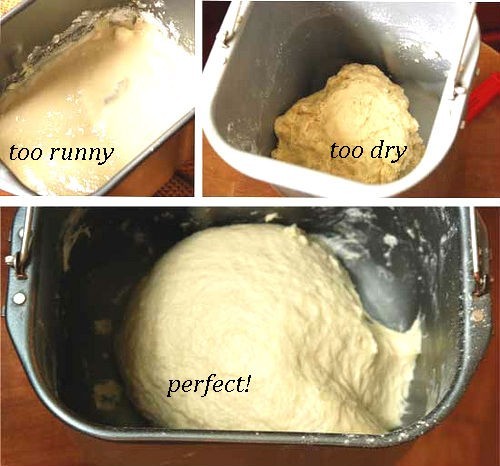
Various bread dough consistencies, Photo courtesy of Salad In A Jar

Photo courtesy of foodie in berlin
Pastry
Problem #1: My tart/pie crusts loses shape and/or the pastry is too crumbly.
Save the day: The tart loses shape because the oven wasn't hot enough and the crust, not cold enough. If your pastry is crumbly, it probably means you've used too much shortening.
Problem #2: My pastries are small in volume, heavy and dense in texture.
Save the day: Either your oven is too cold, or your pastry dough was underproofed. Proofing is letting your dough sit, waiting for it to rise as the yeast leavens it. Over-proofing leads to collapsed pastry with holes, while under-proofing leads to what you got -dense, heavy pastry!
Problem #3: How do you know when the dough has been proofed sufficiently?
Save the day: As a general rule, you can poke your (clean) finger into the dough. If the hole dent pops halfway back out, it is just right. (Hole disappears -underproofed, hole entirely dented in -overproofed)
Sweet nothings
We aren't going to lie and say that anyone can transform into Martha Stewart overnight. However, with some helpful tips and (good!) advice, you can save the day and perhaps prevent a huge mess in your kitchen. The trick is to follow the recipes very closely, down to the temperature degree and duration of beating your mix. Baking may not be rocket science, but it's still science and that requires precision!
See Also:
Visit these popular artisanal bakeries
Satisfy your sweeth tooth